App Install/Engagement
You can create mobile App Install/Engagement ad campaign and display it on the mobile app and mobile web.
Here are the steps to create an ad campaign through App Install/Engagement.
- Sign in, go to the left panel and click Campaigns > Create New Campaign.
- Choose campaign objective App Install / Engagement, click Create Ad.
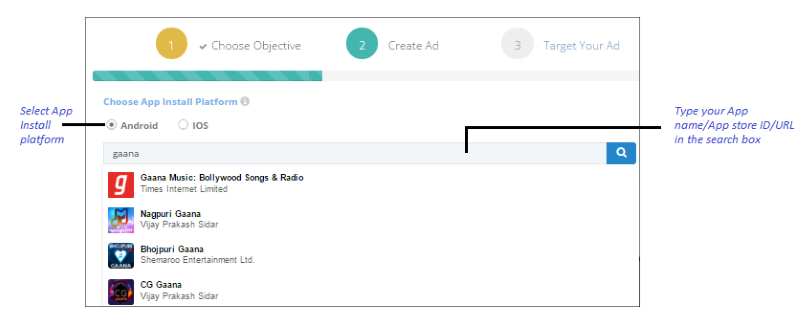
- Select your App Install platform type (Android or iOS).
- Search your app by typing the App name/App store ID/ URL in the search field; select and enter your app.
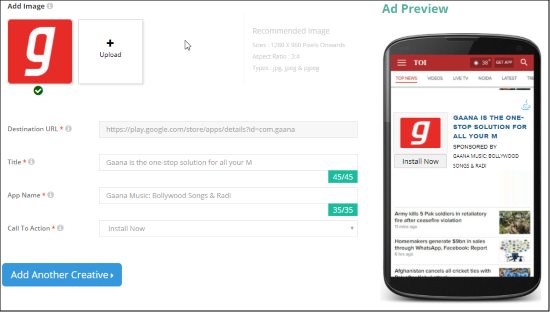
- Enter the Title, App Name, and select a Call To Action.
- You can also upload additional images add more creatives to the ad (as shown in the below screenshot).
- The Destination URL (Google play store/apple store landing page) will be auto-fetched and cannot be edited.
- You can see an Ad Preview (on the right bottom corner of the screen)
- The below image specifications are recommended
- Sizes : 1280 X 960 Pixels onwards
- Aspect Ratio: 3:4
- Types : jpg, jpeg & pjpeg
- Click Target Your Ad.
- On the targeting screen, select your target Geo locations.
- The Platform will be pre-selected as Mobile only. You can further choose out of Mobile web or Android/iOS App from the Advanced Options.
- You can include or exclude Geo locations as per your ad’s requirement. Worldwide remains pre-selected as a default.
- For an Android/iOS-based app, we automatically target Android/iOS devices respectively.
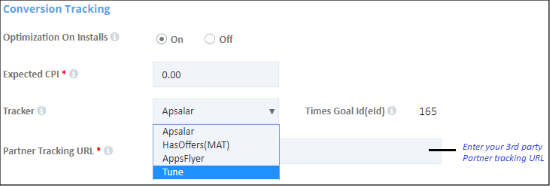
- You can choose whether you want to optimize your ad on Installs or not.
- Select your third-party tracking partner
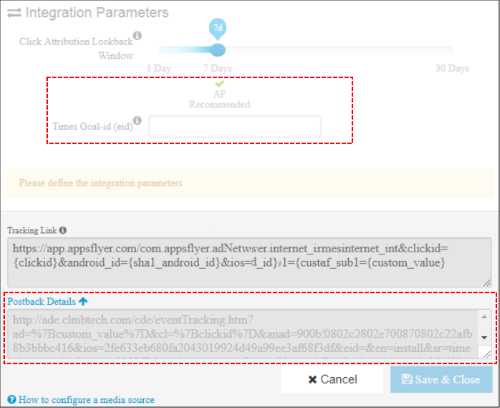
- Enter the Partner Tracking URL of the selected 3rd party tracking partner. This can be generated by providing the Times Goal ID (eID) on the 3rd party tracker partner’s portal (as shown in the below screen-shots).
- If you activate your campaign’s Optimization on installs, you would be required to provide an expected CPI (Cost per Install) value for your line item ( the value cannot be 0).
- If the Optimization on installs is ‘Off’, the conversion of the campaign will be calculated in clicks.
- If your partner tracker is not in the given list, you can use your own ‘Custom’ tracking URL.
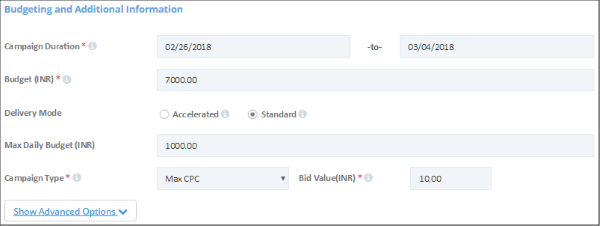
- Enter the Budgeting and Additional Information such as campaign duration, budget, delivery mode, and other significant details.
- Click Pay & Go Live!
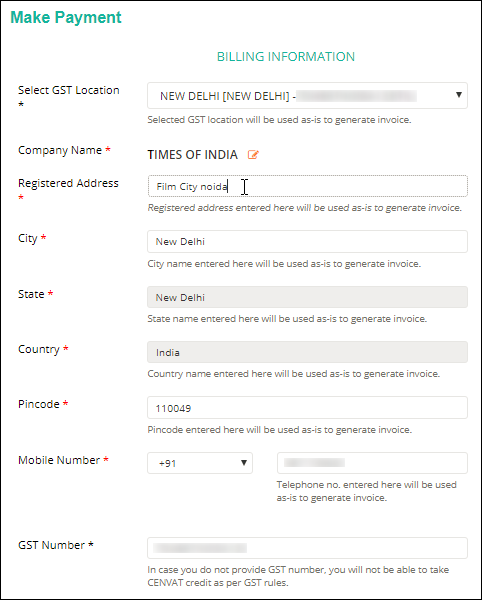
- Enter or update the Billing Information, and make the order.
Notes:
Notes:
Notes:
In the given Advanced Options, you can make changes in the campaign name, line-item name and the frequency setting.
